Repairing Anything
This page started out as a Repairing Macbooks page, but I’m going to put all repairs I do on things here, just to remind myself how it’s done.
Fix Violin(s)
I’ve been wanting to play the violin for quite some time now. I’m now 70, and it’s now or never. At the moment, I can’t afford an expensive instrument: expensive to me is actually anything over $150. Eventually, I might be able to justify a $5000 to $10,000 instrument, but that time is well in the future.
As I do, I’ve been looking at everything I could find on getting started: instrument pricing, courses on learning how to play the thing, maintenance… everything. I even explored the art of the luthier: violin-making. Looks fascinating!
The most obvious place to start looking for a used instrument was Ebay, but I decided that Facebook Marketplace would yield results where the seller was closer to home and I’d save myself the hassle and cost of shipping.
There was a lot to choose from! After a false start in Arana Hills on 12th of January (the violin was a 3/4 size: I needed a 4/4), finally starting to find what I was after.
2023-01-16 - The Stentor
The first student violin (purchased in Stretton) I actually brought home went for AUD$150.00 on Facebook Marketplace: I was pretty sure this Stentor was going to be the one I learned to play on. And it has been sitting in my closet pretty much since I bought it.

Eventually, we’ll have to see what to do with this one.
2023-01-23 - The Czech
A Gem in the Rough
To practise restoring/maintenance skills, I found a violin (in Algester) for AUD$80.00 on Facebook Marketplace. It has the following inscription:
Antonius Stradivarius. Cremonensis
Faciebot Anno 1713
Made in Czechoslovakia
So, there’s that.
What inspired the purchase of this particular this violin was this video:
I couldn’t find what Kevin recommended: Joha varnish cleaner.
However, the cleaner that appears to be available in Australia is Hill’s. I actually ended up getting this OldWood Italian Cream Hg.
The violin itself hadn’t been used in ages: the A-string was missing and it clearly hadn’t been cleaned or tuned in a while. The image on Marketplace looked promising:

It was really meant to be a ‘violin cleanup’ project, not the instrument I’d be learning to play on. I first started trying to clean it with just using a cloth, cautiously:

It quickly became apparent that using brown t-shirt material was not a good choice:


Was it varnish I was removing, or something else? No idea: all I could see was that any rubbing wasn’t going to remove the rosin residue as much as dull the polish. Also, there were these spots:

…which sort-of looked like mould to me:


The bridge needed adjusting:

Not sure about this neck:


Here, you can just make out how rubbing was dulling the polish a bit, only just:


So I stopped doing what I was doing. It seemed likely I wasn’t removing the rosin residue so much as smearing it around. The cloth needed to be white, clearly.
Removed the chinrest (carefully, with a bent clip, so as not to scratch the varnish) and this is the cork and sticky stuff it left on the violin:


That’s been carefully cleaned off, now. Might go with a better chinrest, perhaps. Also, investing in a proper chinrest removal tool (AUD$5.00 at Simply For Strings).
First Cleaning - Jan 25th
Last night, I started using a white cloth (feels like microfibre) to clean the violin - these were sock-like thingies that the lenses I purchased came in. The approach to cleaning was this:
breathe on a small section
carefully ‘polish’ in line with the grain, hopefully removing rosin residue
“rinse and repeat” (not literally, no water came anywhere near the violin)
I made a point of not pressing hard, particularly around the f-holes, which seemed particularly fragile. Long way to go yet, but I reckon I’m seeing an inprovement.


The area around the f-holes required extreme caution. It looked like someone had not-too-carefully adjusted the soundpost and damaged part of the edge. That might need filling in or something.
It seemed that the varnish had like micro-cracks in it. The cloth seems to snag (horror of horrors!!) noticeably around the f-holes. Pretty sure this needs addressing, in some fashion.
Although the purchase price of the violin initially emboldened me to undertake polishing this violin, with time and watching more of Kevin Lee, Luthier’s YouTube channel I’ve been changing my view on how to approach the task.
I had purchased some Pirastro Tonica strings at Vivace Music in Sunnybank Hills for $60 as replacements, of which I’ve replaced the D, A and E so far, changing out the strings one at a time. Tilted the bridge towards the tailpiece after letting the violin get used to the new strings first. Did the graphite thing on the bridge and nut, as well as applying peg-paste on the pegs.
Peg Adjustment - Jan 31st
After my chiropractor appointment, popped up to Red Hill to meet with Michael at Simply For Strings.
He very kindly not only showed me how to revive the rather used-up pegs so they would work for a bit longer, but gave me all sorts of incredibly valuable tips and ideas on violin maintenance and care.
When I buy my next violin - the upgrade - I’ll be purchasing it from Simply For Strings … they have been simply wonderful!
Initial Exercises - Feb 1st
Michael kindly emailed me some exercises to do - just until I sort-of engage a formal instructor. Not trivial, these exercises! Just getting a decent sound out of ‘open strings’ is a challenge. And yet, oddly enough, achieveable, with a bit of work.
Polish - Feb 5th
Did a bit more polishing with the OldWood Italian Cream… a bit with that, but mostly breathing on the wood and polishing with white microfibre:

As one can see, the issues under the fingerboard and near the bridge are pretty much resolved:


The bridge is positioned correctly: upright and not leaning towards the fingerboard, which can easily happen with much tuning:


The bridge slots - where the string passes over it - have been ‘lubricated’ with soft pencil lead:


Whilst it is recommended to keep your violin in its case, I’m defying those instructions:

…only just because having the violin visible reminds me to practise.
Practising - Feb 22nd
Self-teaching is actually a very hard way to go. Having an instructor would indeed make things significantly more consistent and would accelerate my progress, but it’s not in the cards at the moment. I have been practising simple open-string bowing, trying to get the bow-hold right, stop the chattering (seems to be a down-bow phenomenon) and scratching … and to just get nice, clear sounds.
It’s slowly actually happening, though - the sound is slowly improving.
I do clean my violin before I put it away, and am still noticing a bit of thread-grabbing around the f-holes. Wondering if sanding - perish the thought! - or polishing or indeed what would make this less of a problem. Might try polishing.
Am signed up for a violin maintenance workshop at Simply for Strings taking place of the 14th of April.
2023-02-01 - The Enrico
Happy Project
This violin hadn’t been touched since 1999. Her strings were toast and the soundpost has fallen:

Initial Cleaning - Feb 4th
Did a bit of a ‘dry’ polish tonight, and discovered that the base is likely coming away from the rest of the body. Which means: removing the whole thing, sanding carefully and re-glueing. Wow, am I really ready for this? I did sign up for a Violin Maintenance course for April 14th at Simply for Strings: might have a word to them as to the advisability of embarking on such an adventure.
Violin Bits and Pieces
To Purchase
Replacement pegs:
Ebony Violin Tuning Pegs 4/4 Size New High Quality
Ebony 3/4 4/4 Violin Tuning Pegs Black Violin Inlay Boxwood
4x Violin Tuning Pegs Ebony Wood Violin Fiddle Tuning Peg
Peg shaper - reamer:
4/4 Violin Peg Shaver Hole Reamer Steel Blade Luthier Tool
Shaper Violin pegs repair tool - violin peg shaver for 1/2 to 4/4 Violin
Sound post setter:
Sound Post S setter W/ Rubber grip protector Luthier gold color
Purchased
Date |
Item |
Price |
|---|---|---|
07/09/2022 |
Tuning fork |
$4.09 |
29/01/2023 |
Violin bow horsehair |
$17.46 |
29/01/2023 |
Leather repair gel (black) |
$14.88 |
31/01/2023 |
Tuning pegs x 4 |
10.89 |
31/01/2023 |
Soundpost setter |
24.39 |
31/01/2023 |
Peg Shaver / Hole Reamer |
$58.51 |
01/02/2023 |
Spruce Sound-Post |
$17.56 |
01/02/2023 |
Tightbond Hide Glue |
$30.90 |
23/01/2023 |
OldWood Italian Cream |
$30.00 |
23/01/2023 |
Pirastro peg paste |
$23.00 |
24/01/2023 |
Violin bow (for Czech) |
$60.00 |
25/01/2023 |
Pirastro Eudoxa rosin |
$23.50 |
25/01/2023 |
Chinrest key |
$4.95 |
25/01/2023 |
Violin chinrest (boxwood; for Czech) |
$27.50 |
25/01/2023 |
Violin shoulder rest (for Czech) |
$27.95 |
26/01/2023 |
Metal practice mute |
$16.50 |
31/01/2023 |
Professional Horse Hair Comb |
$5.93 |
24/01/2023 |
Pirastro Tonica strings |
$60.00 |
29/01/2023 |
HERDIM HAIR GAUGE (Item Code 2812) |
$34.00 |
04/02/2023 |
TOTAL |
$492.01 |
Not counting the batting and velvet I got at Lincraft ($17) for The Czech’s case, the subtotal - not including the actual instruments - is just shy of $500. Adds up fast, and I haven’t even invested in any tools, really.
Considering that the Stentor was $150, the Czech $80 and the Enrico $40, plus the other stuff:
* $492.00
* $150.00
* $ 80.00
* $ 40.00
* $ 17.00
* -------
* $779.00
Ready to Upgrade - Mar 12th
I’ve been trying to learn to play, and am actually just doing open strings. To dilute the sound a bit and make the process a bit more fun, I’ve written this little piece around bow circles:
All it does is surround the second violins - the part I actually play - with something sort-of interesting. You can have a look at the score - such as it is - here. We’ll see what folks think. All this mucking about has convinced me - well, others have emphasised this! - that I really need to get a real violin! So, I’m hoping to sell video lighting equipment (part of a Swedish death-clean strategy) and put the proceeds towards this one:

The idea being, of course, that if you haven’t used or loved something in a long time, it’s become an anchor. I’m actually considering doing the same with my GH5 and lenses.
Selling to Get Cash - Mar 12th
In order to fund this violin, am going to need to sell stuff. Here’s the list:
2022-05-19: Godox SL60w
that I purchased back on the 19th of May, 2022, along with a log profile for the GH5. Purchased for AUD$135.15. Selling for $110.
2019-10-30: from ZestAds (FB) DroneX Pro purchased for AUD$161.06. Selling for $95.
(For GH5: Panasonic DMW-SFU1GU V-Log Profile Code for AUD$149.00)
It Gets Real, Now - Mar 14th
I’ve done it: went and purchased My First Real Violin. I’m going to be out less than I thought, but I still need to sell stuff.
Godox has sold - March 16th
So, now I owe my own account:
$  970.00 - The Gliga II
-$ 500.00 - transfer from ING savings
-$  65.00 - labour on the iMac 2011
-$ 100.00 - sale of the Godox
=========
$  305.00
Still a ways to go. If the stabiliser sells, this is sorted!
Repairs on Macs
Some time ago, I bought a used Macbook Pro 2012 for AUD$995.00 plus shipping. As I had read up on Macbooks in general, this particular model stood out as a great system for upgrading. It already had a 500gig SSD (vs HDD) but I needed more space to edit video, so I took out the optical drive, got a caddy to hold another SSD and installed a second drive.
And realised that doing this was fun.
Then Julia dropped her 2011 Macbook Pro, one I’d purchased for $500. The keyboard was what had suffered the most damage, interestingly. Replacing the keyboard on the unibody meant pulling everything out. And having this repair done would have cost well over $200.
Too daunting.
Well, I finally pulled the machine down from the cupboard - where it had been sitting for almost two years - and pulled it apart. Purchased a new keyboard on eBay for $35 and did the replacement.
The machine works beautifully!
So, that’s what got me started.
Dated Repair Notes
WR-2021.Sep.25
The multimeter (that yellow thing with the knob on it) is, at this point, only there to impress. I haven’t actually gotten around to figuring out how it will help me decide what components are defective and need replacing.

Julia got those two tables for free from work… they’re moving to smaller quarters and needed to unload stuff.

The logic board in the Macbook Air (2015) that one can see sitting on the farther desk failed as well. It played up and finally refused to work. Got a replacement on eBay for $250… and the seller gave me $50 back for the non-working board! Win-win!
WR-2022.Apr.23
Since the last entry, Julia has organised some melomine bookshelves for my office (again, they were going to throw them out, so she saved them from the landfill!) to put all my bits-n-bobs stuff in. One of the desks is now in use in her office, and I have all this storage space now for my repairs-n-stuff:

I tend to buy stuff that’s like the cheapest-ever, crazy-low price. The printer? $50. It’s a laser printer. It had a problem: paper wouldn’t feed. Kind of a show stopper. The problem was the pick up roller so for $20 or so picked one up, installed it and it works perfectly. I.e., a laser printer for $70.
The monitor in the foreground - actually an iMac 2009:

…which I found on the Facebook marketplace for $100. The guy claimed the OS was installed. No such thing. Thing is: Apple no longer support these devices… too old. Found a solution to that problem, so it actually has Catalina installed now.
And I’m currently working on another Macbook Pro that had been pretty roughly treated: the case had been distorted with the network cable (cat 5) goes in. And grubby-as! but the logic board is fine, needed to replace the keyboard:

… so we’ll see what ends up happening to this machine.
Replacing a Battery in a Macbook Pro
Note: these instructions are mostly from the iFixit site:
https://www.ifixit.com/Guide/MacBook+Pro+13-Inch+Unibody+Mid+2012+Battery+Replacement/10365
Place the macbook face down on some paper towels or flat soft cloth. Do this on a table in a well-lit room. ‘Flat’ is important, because if you do this in your lap, besides risking the loss of those teeny-tiny screws, as you put the bottom back on it can distort - I know from experience, happened to ME! Remove the bottom case. I’ve included the screwdriver for these ten screws in the longish box in the Macbook box - the one with the hole in it. You will need to remove:
Three 14.4 mm Phillips #00 screws
Three 3.5 mm Phillips #00 screws
Four 3.5 mm shouldered Phillips #00 screws
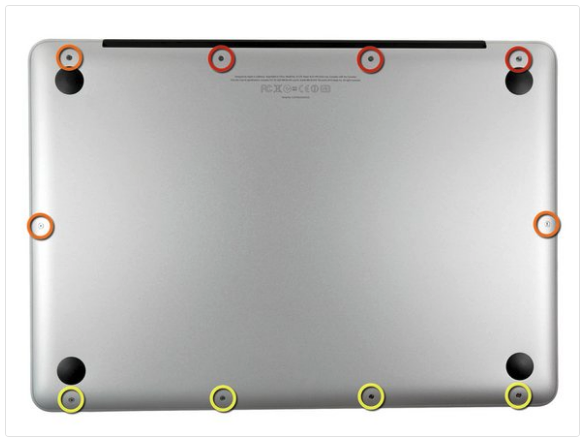
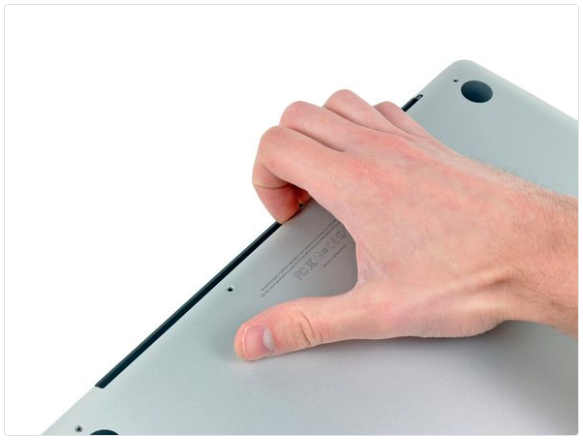
Pry the bottom off with your fingers at the vents.
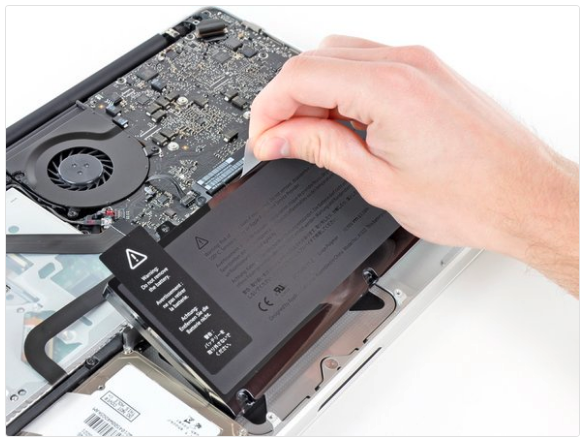
I’ve included paperwork, a screwdriver for the battery screws (they’re tri-point) and the screws in a ziplock bag. Remove all this before sliding in the battery. It only goes in one way:
Attach the following two screws:
One 5.6 mm Tri-point screw
One 13 mm Tri-point screw
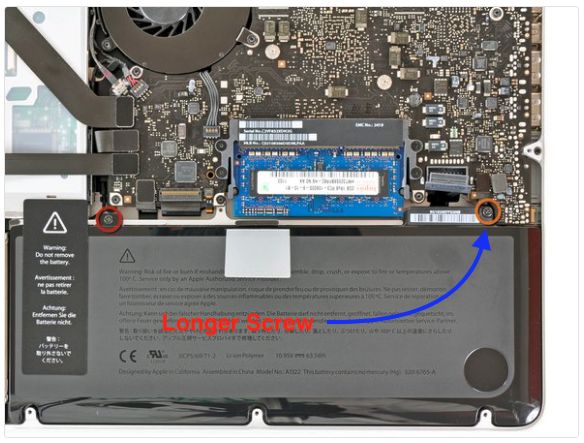
Note on 2022.Apr.25: the longer one goes near the battery connector to the logic board. You may need to slightly adjust the battery a bit for the screw to “take”. I have found that if you get the long one started (not tightened completely) and then do the shorter one it’s less of a struggle.
Connect the battery connector to the logic board.

Replace the bottom with the vents towards the back (where the screen hinges to the laptop) and screw the bottom in place as shown:
Note: when replacing the small screws, align them perpendicular to the slight curvature of the case (they don’t go straight down).
When installing a new battery, you should calibrate it after installation in order to maximise its lifespan:
Charge it to 100%, and then keep charging it for at least 2 more hours.
Unplug and use it normally to drain the battery. When you see the low battery warning, save your work, and keep your laptop on until it goes to sleep due to low battery.
Wait at least 5 hours, then charge your laptop uninterrupted to 100%.
If you notice any unusual behavior or problems after installing your new battery, you may need to reset your MacBook’s SMC.
Current Repair Ledger
RL-2022.Apr.29
Replaced the speakers on Julia’s 2011 Macbook Pro. This was a bit involved, as one speaker sits next to the CPU on the underside of the logic board, and part of the other speaker sits right on the side of the case, so replacing it involves removing the optical drive. Typical repair quote (see above link) currently runs about AUD$300.00 plus parts.
A Note On the Bottom Screws
I didn’t realise this at first, but the bottom of the 2012 Macbook is actually held on by three differeent sets of screws (I thought they were just long and short ones). This bit of advice came from my GOTO iFixit site step one - copy this link into your browser:
https://www.ifixit.com/Guide/MacBook+Pro+13-Inch+Unibody+Mid+2012+Battery+Replacement/10365
DosDude1 Patcher
Background
Back when developing the Catalina patcher, u/dosdude1 released this note:
“I have just released version 1.3.6 of Catalina Patcher, which should fix the issue where some third-party applications wouldn’t launch. If you have been having this issue, you can either use the latest Catalina Patcher version, or run:
sudo nvram boot-args=amfi_get_out_of_my_way=0x1
… in Terminal, and then reboot.
Run “sudo nvram boot-args=amfi_get_out_of_my_way=0x1” in Terminal then reboot. That should take care of that issue.
This little fix has been a huge lifesaver. prior to installing it, apps like Microsoft office and chrome and a few others would crash upon launching, after applying it I have found on occasion, that some apps I would later install would not run properly, and I was wondering if there is a way to either:
reverse this sudo command.
modify this sudo command so that it doesn’t apply to some programs while being effective to others.
possibly a new sudo command I can use to reverse the effects with certain apps?
Mac Repair Links
CRUCIAL Find My Mac. Also, Ultimate Mac Lookup
Manage the Mac
How to prepare a Mac for sale.
Securely erase data from your Mac
Kernel Driver Not Installed: rc-1908 error
Fan control daemon for Apple Computers running Linux
Running Linux on Mac devices, controlling the SMC
IFixit Pages
OpenSource OS Installers
The LegacyPatcher download site,
The 0.6.1 release.
MrMacintosh’s MacOS download site
GitHub Dortana Patcher (a)
GitHub Dortana Patcher (b)
MrMacintosh’s page on downloading full installers for older versions of MacOS
5 Comments
tejljr
The Library Validation Patch should fix things like this. This was introduced in Catalina Patcher 1.4.4
RamosHE · 10 mo. ago Besides executing the dosdude1 nvram command. I need to mention that i also turned off gatekeeper using the instructions in the link. But either way al my third-party opening problems are fixed.
Reference
mw556 - OP
I will give this a try. thank you.
RamosHE
I had the same problem even when using the latest Catalina patcher version 1.4.4. The “sudo nvram…” command solved the problem of Microsoft office apps, Chrome browser, Edge browser crashing at start up.