Mac Tips, How-Tos and More
Basic Tip and Tricks
Screen Captures
For the whole screen:
[Shift][Command][3]
or for a part of it:
[Shift][Command][4]
You’ll get a rectangular outliner to define what you want capturing. To change the type of image that gets saved (default is .png), open Terminal and enter:
defaults write com.apple.screencapture type png
The last string can be changed to jpg, tiff or even pdf.
Allowing an App to Run
Use this script:
xattr -d com.apple.quarantine ~/path/to/vst/CoolVST.vst
- For SWS you can fix it by running this from Terminal.app as well::
xattr -d com.apple.quarantine ~/Library/ApplicationSupport/REAPER/UserPlugins/reaper_sws_extension.dylib
Toggle File Visibility
Make sure a folder is actually active, then press [Shift] [Command] [.]
Get the Path to a File
To quickly find the fully-qualified path to a file, open a copy of terminal and drop the file onto it.
Make a Script Executable
Shell scripts must be executable files in order to run. You can use the chmod command to indicate that the text file is executable (that is, its contents can be run as a shell script). In the Terminal app on your Mac, use the cd command to move into the directory that contains the file you want to make executable. For example:
cd YourScriptDirectory
Enter the chmod command. For example:
chmod 755 YourScriptName.sh
After making the shell script file executable, you can run it by entering its pathname:
~/Documents/Dev/YourScriptName.sh
or:
cd ~/Documents/Dev/
./YourScriptName.sh
Make a Py Script Executable
Make sure you have:
#!/usr/local/bin/python3
at the top of the script (for Python3 scripts). Then, in Terminal, issue a:
chmod +x -/path/NameOfScript.py
Networking
Configuring Linux Mint for Networking
Sharing Windows, Linux and Macs on a Network
Advanced Software Work
Formatting a USB Drive to GUID
When I try to erase and format a USB drive from the MBR to GUID I can not find a way to do that. The partition button is grayed out and I’m stuck.
To format a drive using Disk Utility first be sure you see the entire drive. In Disk Utility menu bar the last icon on the left “View” set to “All Devices”. Then choose your entire drive (Uppermost, unindented icon). Format Mac OS (Extended) GUID Partition Disk. Erase.
Reset SMC
An SMC or System Management Controller Reset can fix various power related issues, such as a piece of hardware not functioning correctly. Here’s how to reset the SMC on notebooks with non-removable batteries:
Shut down your Mac. Press and hold Shift, Control, and Option on the left side of the keyboard. At the same time, press the power button. Hold for 10 seconds. Release the keys and then turn on your Mac.
Reset NVRAM or PRAM
Shut down your Mac, then turn it on and immediately press and hold these four keys together: Option, Command, P, and R. You can release the keys after about 20 seconds, during which your Mac might appear to restart.
CLI Make Bootable ElCapitan USB
Rename USB drive to elcapitan
In Terminal:
sudo /Applications/Install\ OS\ X\ El\ Capitan.app/Contents/Resources/createinstallmedia --volume /Volumes/elcapitan --applicationpath /Applications/Install\ OS\ X\ El\ Capitan.app
Shut Down Mac During Setup
How to Turn Mac off at Set up Screen If you want to leave the Mac in an out-of-box state, don’t continue with the setup of your system. Instead, press Command-Q to shut down the Mac. When the new owner turns on the Mac, the Setup Assistant will guide them through the setup process.
Cloning An SSD on a Mac
Disk Utility has always been able to create clones, although the app refers to the process as Restore, as in restoring data from a source drive to a target drive. The restore function isn’t just for drives. It will work with just about any storage device that you can mount to your Mac, including disk images, hard drives, SSDs, and USB flash drives.
How Restore Works
The Restore function in Disk Utility uses a block copy function that can speed up the copy process. It also makes an almost exact copy of the source device. What “almost exact” means is that a block copy moves everything in a data block from one device to the other. The results are almost an exact copy of the original. A file copy copies the data file by file. While the information remains the same, the location of the file on the source and destination devices will likely be different.
Using a block copy is faster, but it does have some limits that affect when it can be used, the most important being that copying block by block requires that both the source and destination devices be first unmounted from your Mac. This ensures that block data doesn’t change during the copy process. Don’t worry, though; you don’t have to do the unmounting. Disk Utility’s Restore function takes care of that for you. But it does mean that neither the source nor the destination can be in use when you use the Restore capabilities.
To Restore a Non-Startup Volume
You can’t use the Restore function on the current startup drive, or any drive that has files in use. If you need to clone your startup drive, you can make use of either your Mac’s Recovery HD volume or any drive that has a bootable copy of OS X installed.
Launch Disk Utility, located at /Applications/Utilities.
The Disk Utility app will open, displaying a single window divided into three spaces: a toolbar, a sidebar showing currently mounted drives and volumes, and an info pane, showing information about the currently selected device in the sidebar.
In the sidebar, select the volume to which you want to copy/clone data. The volume you select will be the destination drive for the Restore operation.
Select Restore from Disk Utility’s Edit menu.
A sheet will drop down, asking you to select from a drop-down menu the source device to use for the Restore process. The sheet will also warn you that the volume you selected as the destination will be erased, and its data will be replaced with data from the source volume.
Use the drop-down menu next to the “Restore from” text to select a source volume, and then click the Restore button.
The Restore process will begin. A new drop-down sheet will display a status bar indicating how far along in the Restore process you are. You can also see detailed information by clicking the Show Details disclosure triangle - although there’s really not much there. Note: this process takes a long time (hours) especially if the source is via usb… we’re talking hours!
Once the Restore process is complete, the drop-down sheet’s Done button will become available. Click Done to close the Restore sheet.
Restore Using a Startup Drive
When you use the Restore function, both the destination and the source must be able to be unmounted. Your startup drive can’t be active if you want to restore it. Instead, you can start your Mac from another volume that contains a bootable version of the Mac OS. The one you use can be any volume attached to your Mac, including a USB flash drive, an external, or the Recovery HD volume.
A complete step-by-step guide is available in Use the Recovery HD Volume to Reinstall OS X or Troubleshoot Mac Problems.
Slow Boot after SSD Upgrade
Question:
My MacBook Pro extremely slow after SSD Upgrade. I upgraded the standard hard drive to a SSD. I cloned the factory drive to the SSD using Super Duper. After cloning the HDD to the SSD I installed it and turned it on. It booted up but not quite as quickly as I would expect for an SSD.
Verified and repaired disk permissions.
Restarted. Boot up time about 1 minute 20 seconds.
Shut down.
Reset PRAM.
Boot up time about 1 minute.
Restarted. Boot up time about 43 minutes.
Didn’t work.
Answer:
The startup disk setting is pointing to a disk that’s no longer in your system. Most probably the OS can’t find it and is waiting for it to spin up: it won’t try the new SSD until a timeout occurs:
Go to System Preferences -> Startup Disk
Click on the bottom left Lock tu unlock the changes
Select Macintosh HD (it’s likely to be the only on the list)
Click ‘Restart…’
Be patient: the restart can take a few minutes.
OS Installation
How to make a Bootable USB for MacOS.
Install Catalina on Apple- unsupported models using the DOSDude solution. Here’s the video:
Hardware Repair and Replacement
Prior to Any Repairs
Look up your exact Mac’s specs on EveryMac.com using the serial number. This can be found under Mac Menu (Apple left-hand corner) “About This Mac” -> Serial Number, or for macbooks, on the bottom cover.
Additionally, some iMac-specific information.
For repairs, I recommend iFixit for repairing iMacs. For example, use this link:
https://www.ifixit.com/Guide/MacBook+Pro+13-Inch+Unibody+Early+2011+Logic+Board+Replacement/5154
copy and paste this into the browser - to see iFixit’s solutions to repairing the 2011 Macbook Pro.
Replacing a Battery in a Macbook Pro
Note: these instructions are mostly from the iFixit site:
https://www.ifixit.com/Guide/MacBook+Pro+13-Inch+Unibody+Mid+2012+Battery+Replacement/10365
Place the macbook face down on some paper towels or flat soft cloth. Do this on a table in a well-lit room. ‘Flat’ is important, because if you do this in your lap, besides risking the loss of those teeny-tiny screws, as you put the bottom back on it can distort - I know from experience, happened to ME! Remove the bottom case. I’ve included the screwdriver for these ten screws in the longish box in the Macbook box - the one with the hole in it. You will need to remove:
Three 14.4 mm Phillips #00 screws
Three 3.5 mm Phillips #00 screws
Four 3.5 mm shouldered Phillips #00 screws
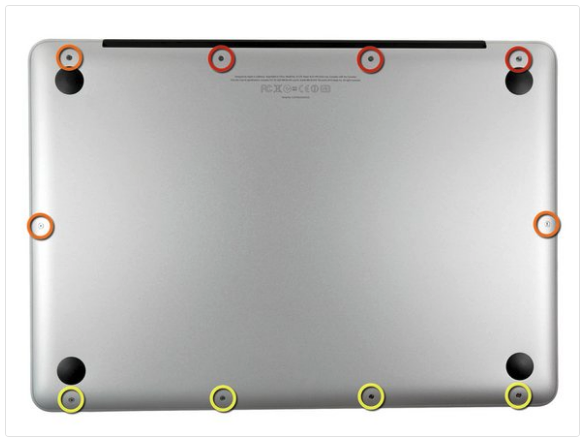
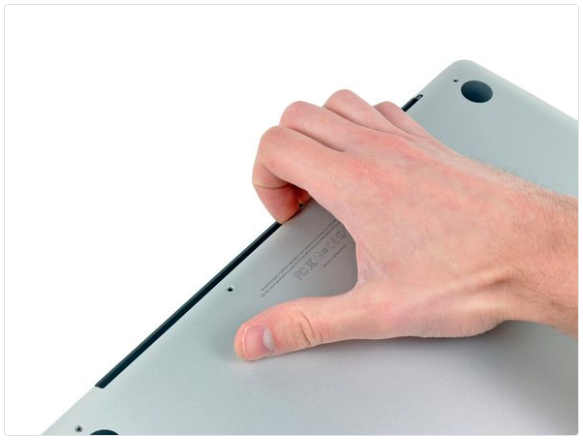
Pry the bottom off with your fingers at the vents.
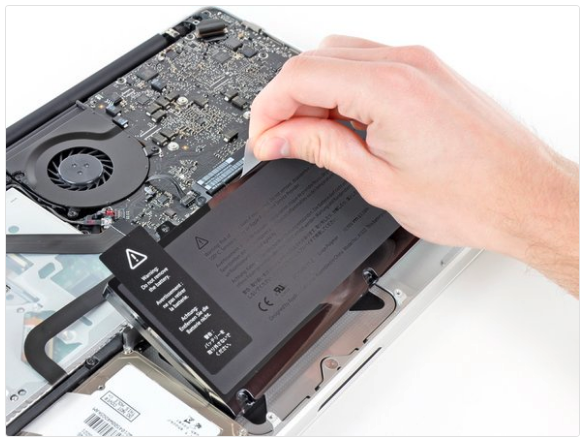
I’ve included paperwork, a screwdriver for the battery screws (they’re tri-point) and the screws in a ziplock bag. Remove all this before sliding in the battery. It only goes in one way:
Attach the following two screws:
One 5.6 mm Tri-point screw
One 13 mm Tri-point screw
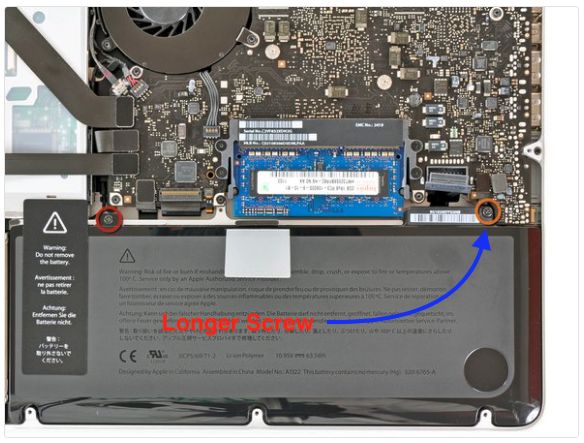
Note: the longer one goes near the battery connector to the logic board. You may need to slightly adjust the battery a bit for the screw to “take”.
Connect the battery connector to the logic board.

Replace the bottom with the vents towards the back (where the screen hinges to the laptop) and screw the bottom in place as shown:
Note: when replacing the small screws, align them perpendicular to the slight curvature of the case (they don’t go straight down).
When installing a new battery, you should calibrate it after installation in order to maximise its lifespan:
Charge it to 100%, and then keep charging it for at least 2 more hours.
Unplug and use it normally to drain the battery. When you see the low battery warning, save your work, and keep your laptop on until it goes to sleep due to low battery.
Wait at least 5 hours, then charge your laptop uninterrupted to 100%.
If you notice any unusual behavior or problems after installing your new battery, you may need to reset your MacBook’s SMC.
2011 a1386 Unibody 15” Keyboard replacement
No guide details this task on iFixit. In the comments section, VikingShips wrote:
It’s a pain in the butt. There are two plastic shields, both with some sort of circuitry on them so you have to be very careful and methodical here. Then there are about 75 VERY tiny screws holding the actual keyboard in place. I changed it because I had a couple of extra bodies laying around, and the body I wanted had a half dozen dead keys. I actually succeeded and the LED lights actually worked afterwards! I was amazed. It took me a good couple of hours to complete. Don’t try it unless you have a lot of patience, time, and a magnifying headset of some sort.
I replied:
@VikingShips – I had the same problem: several keys were not working. (Side note: it appears that iFixit doesn’t provide a teardown guide with images for the actual keyboard replacement. It should be doable as I was able to purchase a replacement keyboard on ebay… happy for someone to point me to a tutorial I may have missed on this task.)
Careful, patient and methodical is absolutely right: the key skill to removing the backlight shield from the keyboard itself whilst not damaging the circuitry. I found that starting with the normal iFixit spudger near the keyboard connector to the logic board and working my way under the actual backlight layer with a wider plastic prying tool (like what you’d use for an iPhone) allowed you to pry away the adhering bits holding the backlight to the keyboard. Special care is needed where the black cover of the backlight is stuck down to the keyboard circuitry (battery side of the keyboard), probably the most delicate operation of this task.
I had to remove the bracket holding down the antenna cables (there was just one long #00 Phillips screw). This bracket also holds down what appears to be the speaker wire - it had a special holder bit I’ll need to put back when I replace this bracket.
The keyboard cable for the power button is stuck down - careful prying with the spudger will be useful here. Two very short #00 Phillips screws hold the oval aluminium plate covering the power button. The keyboard screws appear to be very tiny #000 Phillips-head ones. 75 of them. A magnifying glass of sorts is extremely helpful, here.
Currently, my work area. I have my own little office which I’ve sort-of made into a film studio / composition retreat / Mac repair station / multipurpose office.
Here’s the main logic board from that 2011 Macbook I’m working on:
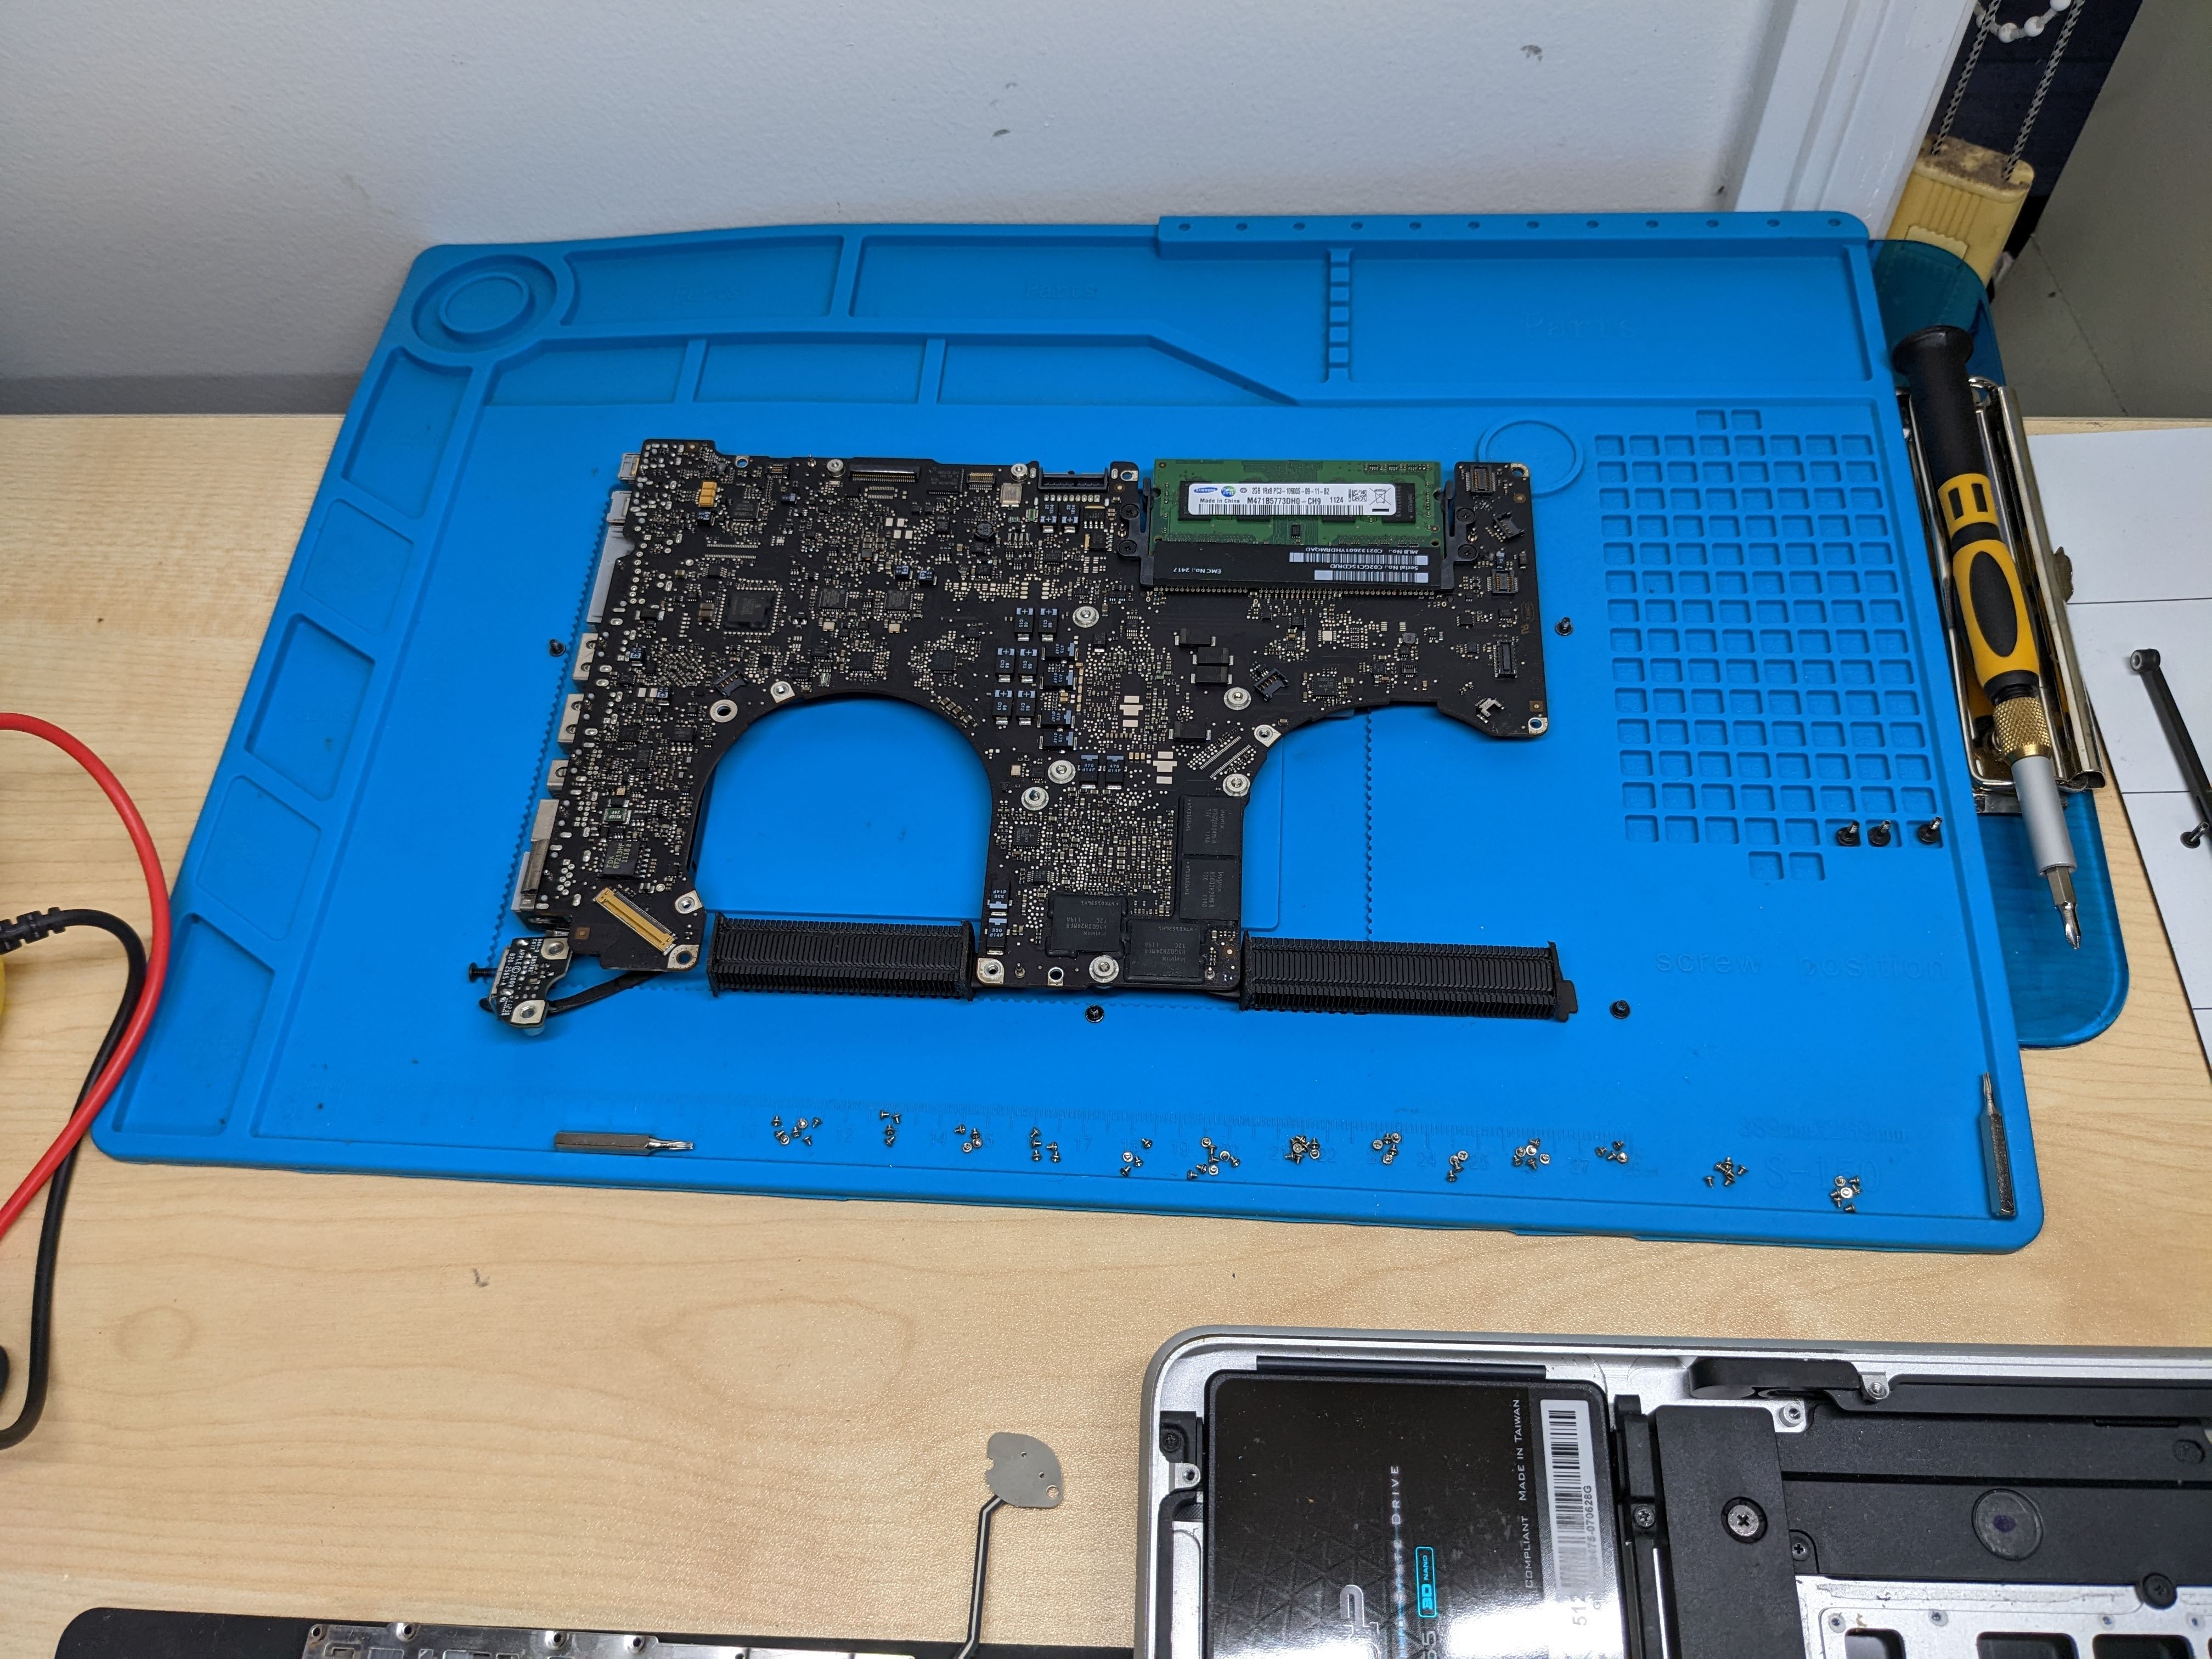
I’ve organised the gnat-sized keyboard screws into little groups. Yep, 75 of them. Around the logic board I’ve placed the screws that hold it in place: no guess-work.
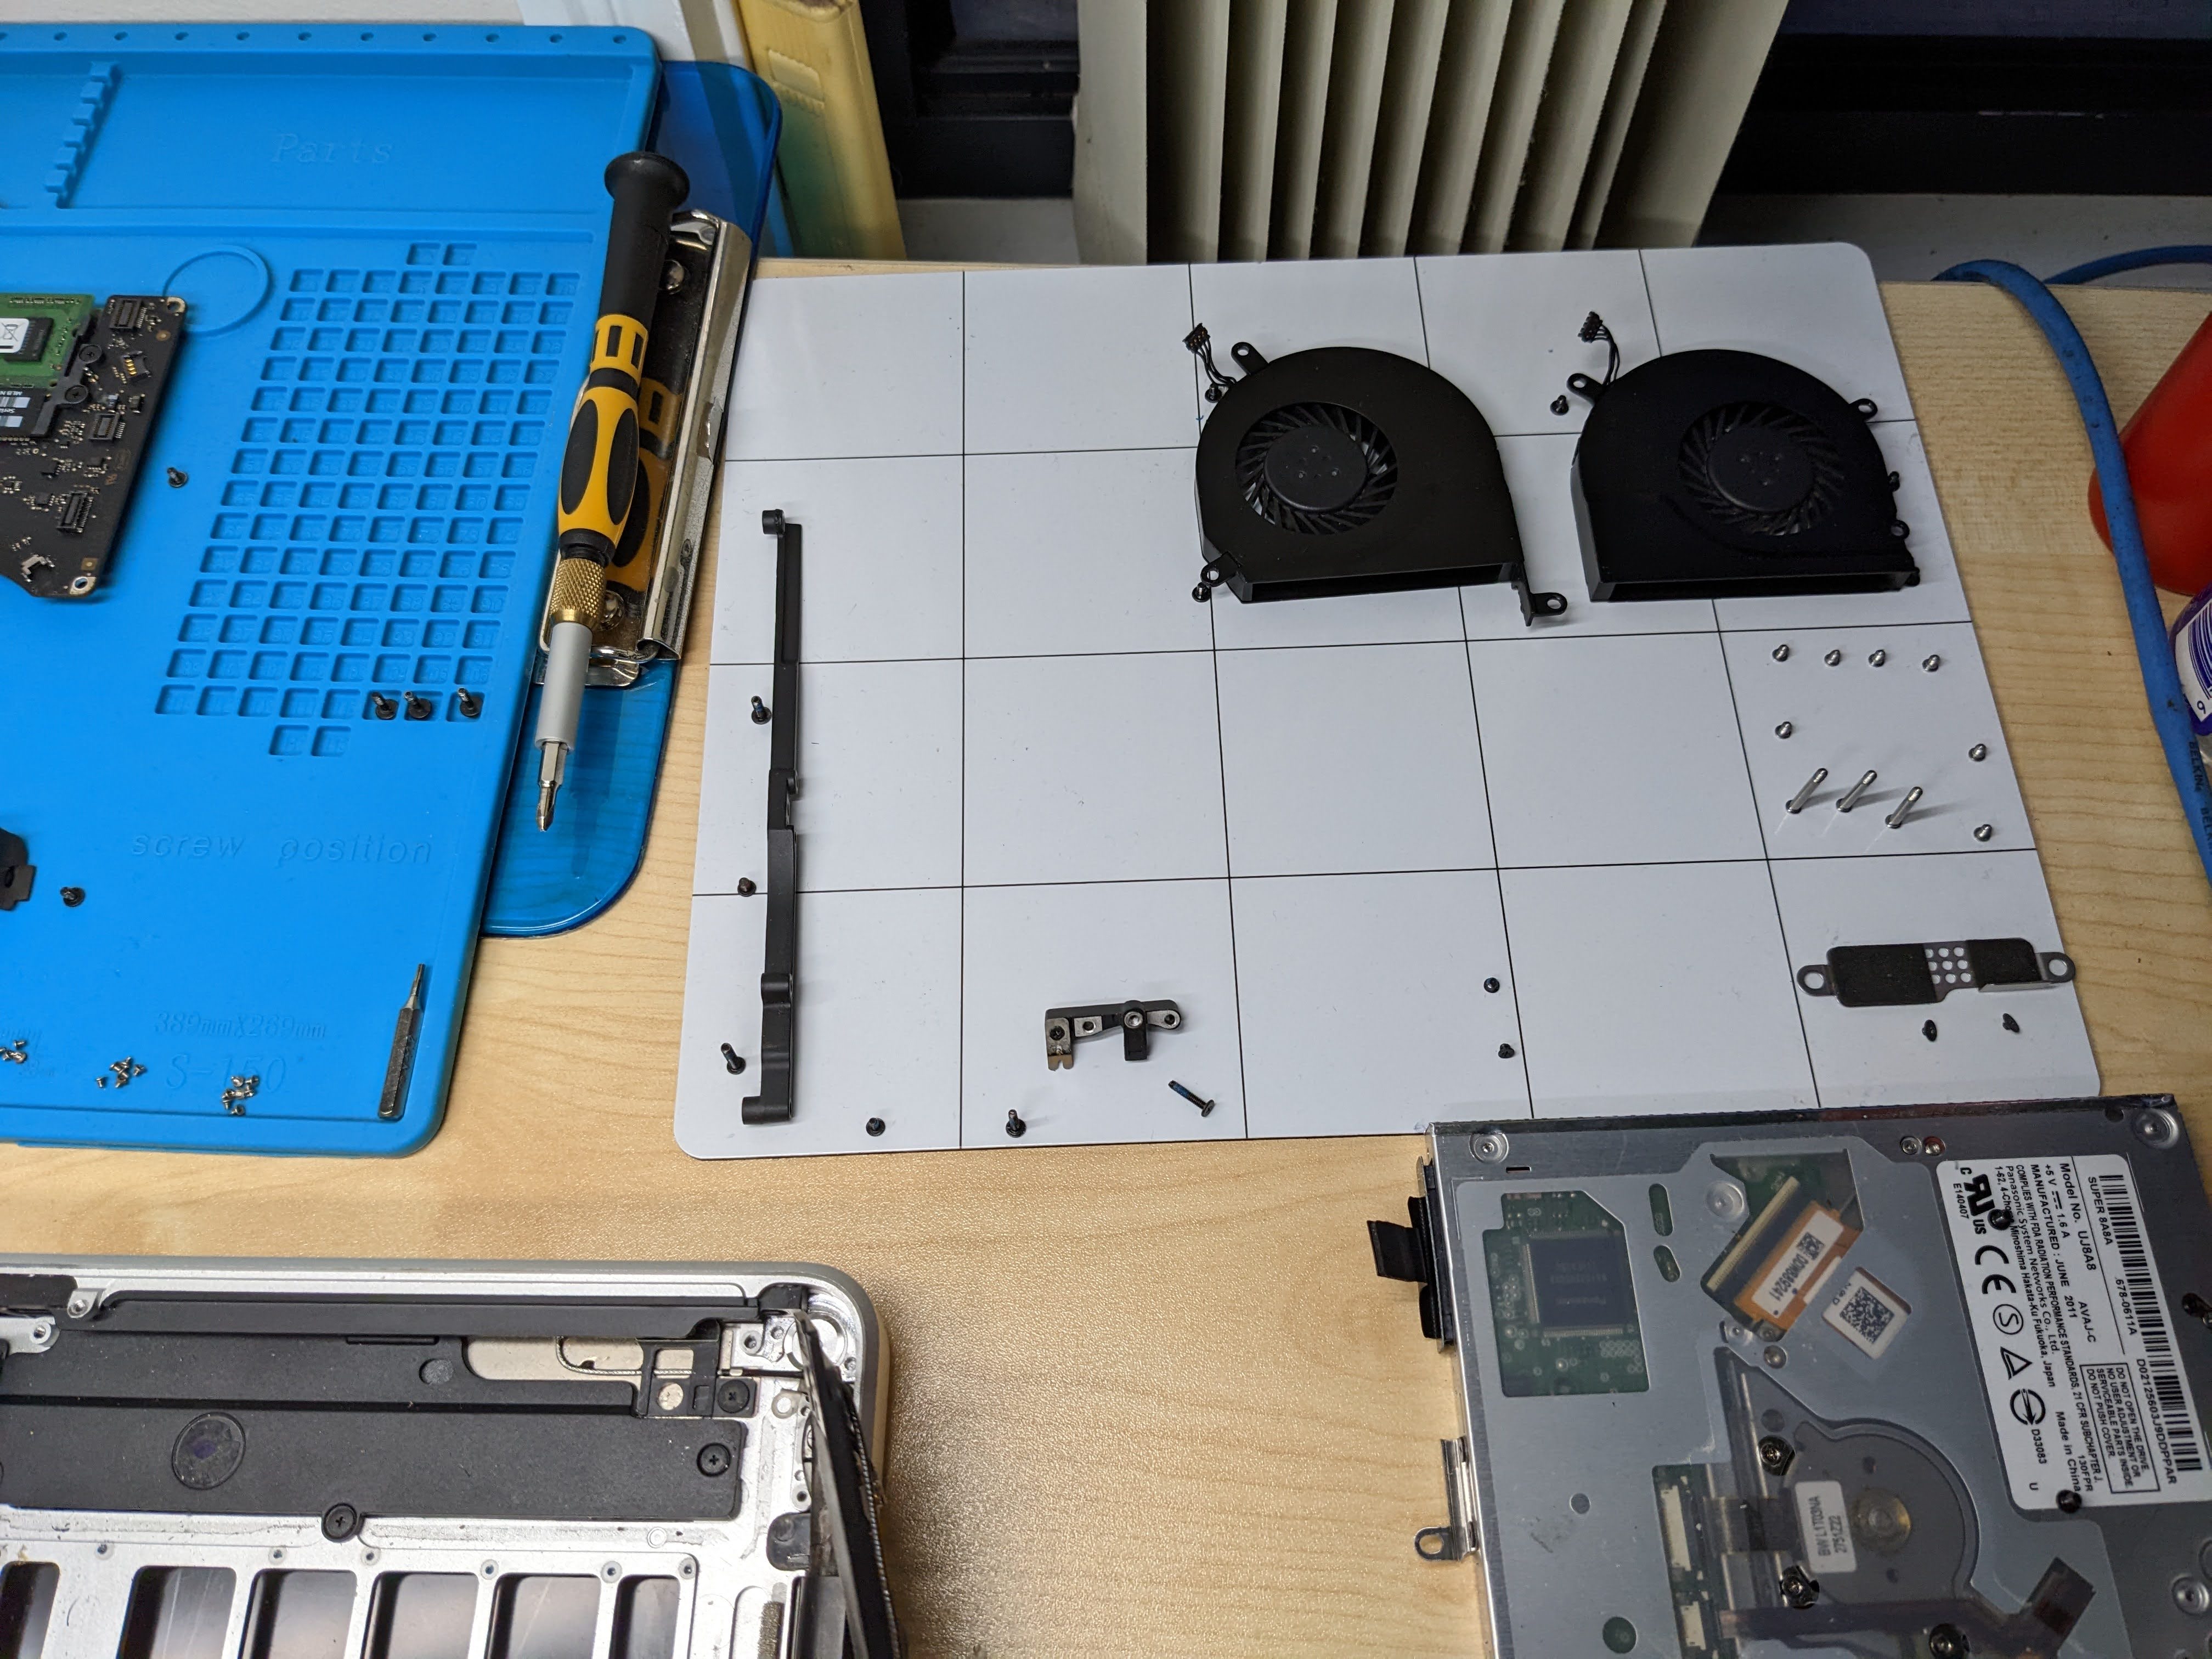
The fans and other bits…
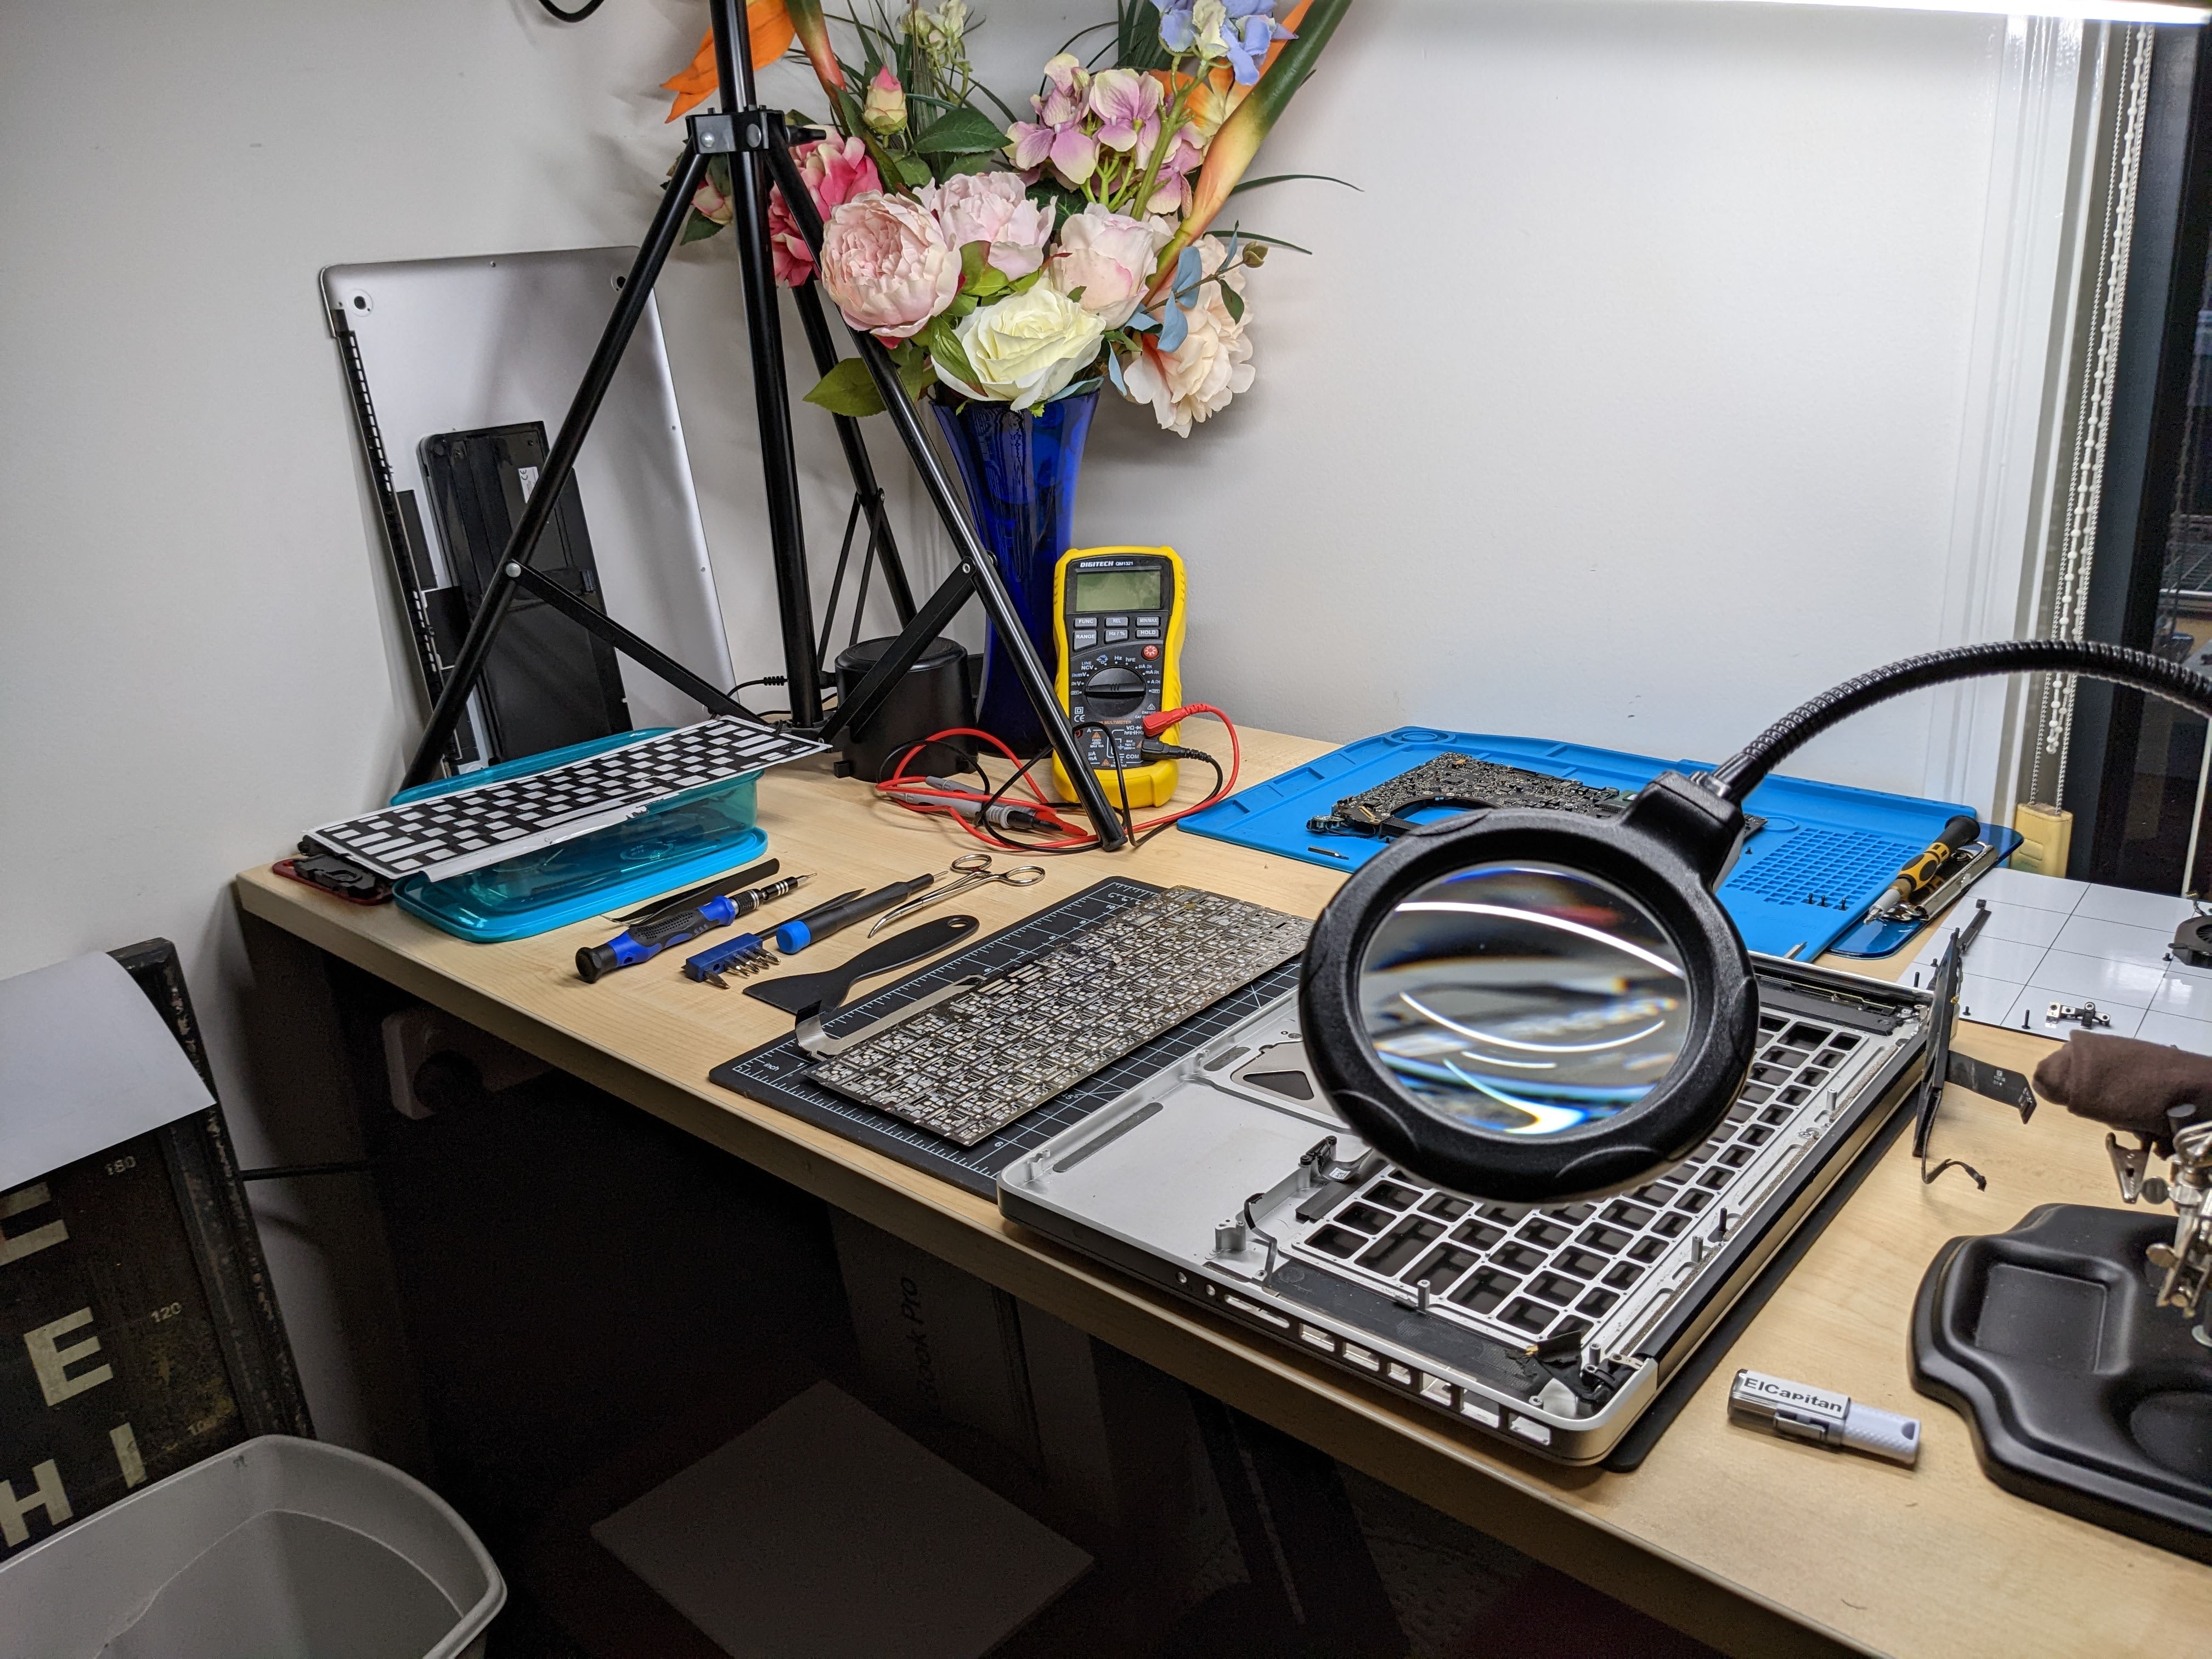
…and generally, my work area.
Repair Support Sites
Stereo Trinocular Microscope
Those links will probably change. Bad idea to buy on Amazon, their terms are poxxy.
Other stuff: